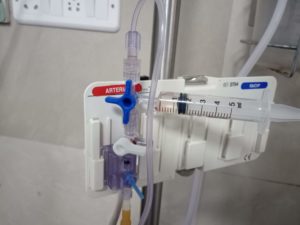
Intraabdominal pressure (lAP) device with transducers will help to find out the Intraabdominal pressure of the patients for a better understanding of the physician.
Indications
- Postoperative abdominal surgery
- Risk patients like intraabdominal hypertension
- Infusing fluid into a urinary bladder catheter.
- Measuring the hydrostatic pressure within the urinary bladder.
Contraindications: Urinary bladder rupture or bladder wall repair within the previous 3 months.
IMPORTANT:
IAP Monitoring Device may be used on a patient for as long as the urinary catheter and urinary drain bag are in place. The Device must be replaced at the time the urinary catheter and/or urinary drain tubing is replaced.
The Transducer enclosed is provided for lAP monitoring only
CAUTION:
Luer lock connections can come loose during shipping and handling. Be sure to check that all Luer lock connections are tight prior to use.
A pressure cuff around the saline bag should never be used.
Instructions for preparation.
Step 1: Preparing the IAP Device
Hang a bag of sterile saline on an IV pole. Open the IAP Device packaging. Remove the protective cap from the saline bag tubing spike and insert the spike into the saline bag.
Step 2: Priming the IAP Device
Aspirate saline and pump the syringe to prime the infusion tubing with saline until fluid visibly runs through the valve of the IAP Device so all air is removed.
Step 3: Connecting the IAP DeviceiceDevice to the Patient using aseptic technique
Place the sterile drape under the connection between the urinary catheter and urine drain tubing. (lamp of the urinary catheter.
Prep the connection of the urinary catheter and urine drain tubing with the antiseptic solution.
Using an aseptic technique, detach the urinary catheter from the urine drain tubing.
Pick up the valve and tear the plastic bag at the short perforation line, exposing the barbed connector. Push the urinary catheter over the barbed connector. Slide the plastic bag along the tubing  exposing the connector for urine drain tubing. Connect urine drain tubing to the valve. Tear the plastic bag at the second (long) perforation line and discard it. Unclamp the urinary
Ensure the urinary catheter to valve connection is dry and then wrap a strip of tape (included in the package) around the end of the catheter to keep it snugly attached to the valve.
Hang the syringe at a convenient spot.
Mounting the transducer
Step 1. Attach the pressure transducer to the patient or the pole at the level of the iliac crest in the mid~axillary line.
Connect the interface cable (not provided) to the pressure transducer and patient monitor. Use a single channel line.
Step 2. Remove the yellow cap and now ”zero” the monitor,
Step 3. Reposition the yellow cap, to its original position facing the yellow cap.
Step 4. Turn the stopcock (off) to its original position facing the yellow cap. The transducer is now open to the patient and ready for monitoring.
Step 5. Zero the transducer at the level of the iliac crest in the mid-axillary line as follows:1.turn the stopcock (OFF) off towards the patient
Step 6. Measuring Bladder Pressure with the transducer Device
The patient should be supine (flat on the back). if this is not at all feasible, always measure at the same head of bed elevation for trending. Retract the plunger to fill the syringe with 20 mL (for adult patients) of fluid. Briskly infuse the fluid into the bladder by fully compressing the syringe plunger within 10 seconds.
(For pediatric patients: briskly infuse l mL/Kg + 2mL, not to exceed 20 mL). This process will inflate the valve, closing off the connection between the urinary catheter and the urine drain tubing allowing a hydrostatic pressure reading.
Step 7.
Recording Intraabdominal pressure allows the system to equilibrate and then note the pressure reading on the monitor at end-expiration. The MP reading will last between 1 and 3 minutes, at which point the valve will automatically open (draining the fluid to the urine drain tubing) and the pressure will rapidly decrease to near zero.
Note:
If the pressure does not decrease to near zero, drain the fluid into the urinary drainage bag and the reading should go to near zero, indicating the valve has opened into the drain position.) Confirm that the valve has opened and urine is draining normally. The valve will remain open (in drain position) until the next volume of fluid is infused.
Step 8. Record Fluid Inputs and Outputs Record the volume of fluid infused into the bladder on the patient’s fluid balance sheet.
Step 9. Monitor Repeat steps 6-8 every 1-2 hours, or as directed by your hospital protocol.
Step 10. Disconnecting the Device When there is no longer required, according to hospital guidelines, either: Using aseptic technique disconnect the device and reconnect the urinary catheter to the urine drain tubing, After removal of the urinary catheter, urine drain tubing, and device, use new urinary catheter and urine drain tubing.
Dispose of all devices according to hospital guidelines.
Complication
Urethral Stricture
Bladder injury
Bladder orifice injury
Foleys urinary catheter out while the procedure
Infection
Hematuria